Wednesday, March 3, 2010

.50 Picture Frame Makeover with Vintage Script


It has been impossible to go outside to spray paint with all the extremely cold weather, wind and snow. Since I have neither a garage or basement, I must impatiently wait for warmer weather to do any big projects.

However, winter is a perfect time to take advantage of being snowed in to complete a few smaller scale projects.


One of the smaller projects I worked on this week is a small angel picture frame I found at Goodwill for only .50 cents. It had a wrinkled piece of plastic inside the frame instead of glass. I simply removed it. 

I painted the frame a soft off-white and instead of putting a picture inside the frame, I placed a piece of scrapbooking paper that I had stamped with words in a beautiful French calligraphy script and cut to size.

 I WAS VERY PLEASED WITH THE FINISHED PRODUCT.


Snow Again! Asheville becomes a Winter Wonderland!


Here it is the first of March and we already have another snow, seven inches this time!!  Here are a couple of shots of my front yard.
The snow turned Asheville into a beautiful winter wonderland. Although it is cold, there is no wind, so it has been very tempting to go outside and enjoy the scenery with everything coated under a beautiful blanket of white.


Wednesday, February 10, 2010

Shabby Chic Decorating

BH&G and Country Living magazines have many beautiful pictures of Shabby Chic decor.

Shabby Chic is a comfortable and casual decorating style that uses vintage accessories, pastels, comfortable furniture, lace, soft floral fabrics, sheer curtains and white painted furniture.

Paint is an easy and expensive way to update outdated, dark and mismatched items into an unified fresh look.

But you don't have to stop there, old picture frames, mirror frames, lamps, vases and baskets can also be transformed into beautiful accessories with a little white paint. Just choose your favorite hues, which can range from a snow white to a darker creamy white color, and you will have a totally shabby chic look in no time!

There is no limit to what you can do with this decorating style, some paint and a little creative imagination. Go for it! Let's see what we can do!

Tuesday, February 9, 2010

Winter Photo


It has been so cold and windy with temperatures way below normal and snow every week, definitely not normal for spring in western N.C.  To pass the time indoors, I found myself playing around with my digital camera and I found I can add sepia tones to my pictures right on the camera! I also figured out how to add frames around them too! The best part is that I did all by my lonesome which is a major accomplishment as I am very technologically challenged. I guess there is hope for me after all...Ha Ha!
So this is what I came up with. Well it's a start anyway.

Saturday, January 30, 2010

Fabulous Goodwill Finds

One of my NEW YEAR RESOLUTIONS was to complete several decorating "projects" that for various reasons had gotten placed on the backburner. However, because of my addiction to treasure-hunting and thrifting, instead over the past couple of weeks I have succeeded in finding new projects to add to that to do list.

I have been searching to no avail for a vintage chandelier for my bedroom. Well, I still haven't located that perfect one, however, I did find this wonderful candelabra at the local Good Will store for $2.00. It holds ten pillar candles and will be a wonderful source of ambient lighting on the desk I am PLANNING to paint and use as a nightstand. Now I just need to decide what color to paint it, hopefully before I go back to Goodwill.

Another fabulous find was these Dollar Tree photo frames. I absolutely LOVE the detailing of the appliques. I plan on painting them white and possibly antiquing them for a wonderfully distressed look. So Shabby Chic!!
My last little treasure of the week was this cute 2-drawer chest that I picked up for a mere .50. It will add a little extra storage for small items and will look great after a centsibly chic makeover.


So now that I have added three new small projects to my plate, I really have to get some of these finished so I have something to blog about next week. Stay tuned for the transformation. It begins now.......

Southern Snow

We don't often see this much snow in western N.C., much less two major storms with major accumulation within 6 weeks of each other. The first snow caught people by surprise and created a lot of havoc, putting Interstate-26 at a complete stand still and stranidng motorist for hours.


After experiencing the 14" blanketing of Dec. 19, everyone was much better prepared for the Jan. 29 snow. Even though they were predicting a foot or more we actually only got around 8 inches the second time. However this is still much more accumulation than normal.


So the area has truly been a winter wonderland lately. Look at this wonderful view view from my front porch. I have found that it has been a wonderful time to stay home, build a fire and get to work on some of my decorating projects.


Friday, January 29, 2010

Floral Pillows


Bright, colorful, patterned fabrics can make dramatic changes to any space, indoors and out. Small splashes of color from throw pillows is an excellent way to lighten, brighten, and add vitality to your decor.

There are several options to cover your existing pillows and some don't even require any sewing knowledge at all; howver, I did sew these.

Look for fabric remnants at various fabric and thrift stores, and even yard sales. If you really want to be creative, you can use pillowcases, sheets, shower curtains, or old clothing items to create unique, one-of-a-kind handmade designer pillows for your space.

I really love the additional pop of gentle color that the fabric adds to my front porch, and how it softens the hard lines of the wrought iron railings and metal bench.

Friday, January 22, 2010

Inspiration

"Faraway in the sunshine are my highest aspirations. I may not reach them, but I can look up and see their beauty, believe in them, and try to follow where they lead."
Louisa Mae Alcott


The above quote expresses perfectly how I feel about my Centsible Chic decorating projects...seeing the possibilities of something worn, dated, or discarded, to believe in my vision of what it can become, and taking the necessary steps to transform it into a thing of true beauty that enhances and brightens up my space.

These photos from Country Living magazine are perfect examples of this kind of creative revitalization and serve as a great source of inspiration.

Wednesday, January 13, 2010

Stenciled TV Cabinet Makeover

One of my favorite pastimes is searching for treasure. No, not buried treasure, but the troves of household treasures that long to be discovered at thrift stores, estate sales, and yard sales. They lie in wait buried underneath awful out-dated paint jobs, or nicked and scratched surfaces. All they need to return to their former glory is a little imagination and alot of TLC.


For example, this beautifully antiqued and stenciled television cabinet was a $35 thrift store find.

When I brought it home, it was battered and bruised. It was plain brown wood, had a few dings and scratches, and the doors were off-track and uneven. I nursed it back to health with some sandpaper and a little elbow grease, then transformed it  using paint, antiquing medium, and stencils.

Unfortunately, I was so anxious to get started on it that I failed to take a before picture, but I love how it turned out...just beautiful!

Sunday, January 3, 2010

Bedroom Curtains From Sheets?

It has been extremely cold in N.C. the past week with windchills below zero, so I took advantage of my warm and cozy workroom to catch up on some delayed decorating projects. I decided to make curtains for my bedroom, a project that I had been putting off since last summer.
Part of the reason that I have procrastinated is that I have oddly sized windows that measure 36" by 48". This makes it almost impossible to find ready-made curtains. I have used blinds with valances and short curtains; however, I really love the elegant foor to ceiling look. So sewing my own custom curtains was my best solution.

In the picture you can see my old short curtain on the right, and the new curtain on the left. WOW!! What a difference!! I loooooovvvveeee them!


I chose sheets with a creamy beige background that complimented my wall color, but they also have thin vertical black stripes which add contrast and coordinate well with the other black accents in the room.

I fashioned these panels out of four full-sized flat sheets that I purchased for $32. These curtains were a HUGE SPLURGE and are one of the most expensive items in my bedroom. Twin sheets could have been used, however, I like the fuller look. Also when using this method, it is important to keep in mind that most sheets are thin and do not offer much in the way of light filtering. 
 
This was an extremely easy project. The edges of the sheet are finished, therefore it is not necessary to hem the sides or the bottom unless you desire a short curtain. Also, these curtains are hung just a few inches below the ceiling level to trick the eye into believing that the window is really much larger. It also causes the edges to fall at exactly the right length so no hemming is required.

The majority of labor is from making the rod pocket which is used for inserting the curtain rod for hanging.   
 
HOW TO MAKE A ROD POCKET :
1.  Measure your window and decide upon the desired length leaving approximately 5 -6" additional inches of fabric at the top for the rod pocket., and another 2.5'"for the bottom hem. Cut fabric accordingly if needed. (NOTE: I did no cutting whatsoever for my project).
2. From the top, fold the front side (the side which you will look at from inside the room) of the material  over onto itself 3"',  2.5' from the top , and sew your seam. (The band at the top of my sheet was white so I made that my turn line, as I didn't want the white to show.) Put your pins in horizontally every few inches along the seam line.
 
HEMMING INSTRUCTIONS: (For those who altered the length of the original sheet)
1. From the bottom, fold the front side over onto itself 2.5". Pin in place and sew 2" from the edge to complete.
 
*** f you don't sew, or want to make it even easier, you can use hemming tape. Just follow the instructions on the package.   

Saturday, January 2, 2010

Fabulous Frugal Find: $5 Table Lamp


BEFORE

This striking table lamp is another one of my fabulous frugal finds. There is a Kirkland's pricetag on the bottom of $59, but I only paid $5 at a local yard sale. The lamp was in fairly good condition with only minor imperfections; however, it didn't come with a lampshade. I originally thought that I would leave this item as is but it was just too dark for my space.

In order to lighten it up and make it a little more Shabby Chic, I decided to paint the whole thing and give it a complete makeover!

First, I primed the base and body and taped off the cylindrical ball in the middle. I then painted the metal part with some Rust-Oleum, Heirloom white, satin spray paint, and the ball with a sage green craft paint. However I felt the green finish was too lackluster, so I then added a pearlized paint finish over the green and now it glistens under the light. I love the way it turned out but I am still scouting for the perfect lampshade.
AFTER

Friday, January 1, 2010

My Under $200 Fully Decorated Centsibly Chic Living Room

I just wanted to share some pictures from my Centsibly Chic home. Most of these pictures are in-progress photos that I took as I was decorating my living room, which the final project cost for the entire room was less than $200 (and YES that includes the furniture)!!


The white antique octogon shaped table was my aunt's, it had a dark finish before I painted it.  The metal lamp on it was a flea market find for $2 that I also painted white. The cute little candle holder was only $.75 at a yard sale.

       I                                                                   
                                       
The white wall plaque had a dark wood finish and the metal center was painted black
 was a splurge, I paid $10 for it. The white tin vase, another yard sale find was $2. The tall  item was gold  and the $.50 candle holder had a dark green finish. I used a spray primer on them before I painted them with Rust-Oleum Heirloom White spray paint.
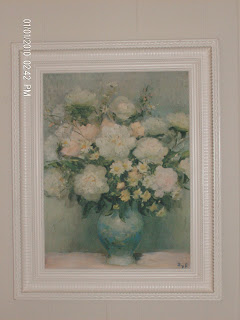
The gorgeous floral oil painting is one that I purchased at a yard sale for only $2. It consisted of the canvas only and was missing a frame. The frame that you see here was FREE and salvaged from a broken mirror, and to my delight, was a perfect fit. Originally the frame had an outdated shiny gold metallic finish, so I primed it and painted it with Rust-Oleum satin Heirloom White satin spray paint. The frame already had mounting brackets attached, so I simply inserted the canvas in the frame and hung it on the wall.

The love seat in the next picture was also FREE, however it has a horrible large floral 80's print in blues and oranges, but the love seat itself was in great condition. So to update its look, I covered it with this soft green floral embossed-look slip cover that I found at a yard-sale for a mere $5!! What a bargain! To accent it, I then purchased some coordinating fabric remnants in a soothing green and yellow floral print at a local fabric outlet store for $4. I then covered the old matching blue and orange pillows. 


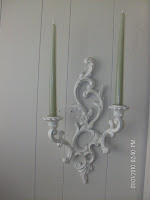
As you can see in the above photo, another fabulous find that I added as a room accent are these great candelabras. They were given to me by a friend who felt that they were outdated. This picture contains both the before and after look of the candelabras. As you can see, the gold finish was peeling off and did make them look very dated. To refurbish them, I sanded each item to remove the loose and peeling paint. Next I primed them and spray painted them to match the floral oil painting's new frame and added these sage green taper candles.

I then placed them on either side of the floral oil painting as accents.

My favorite piece in my living room however is my television cabinet. It was a thrift store find which I purchased for $35. It was in poor condition but was solid maple. Tho original finish was a medium wood-tone. The sliding doors were off track. It was heavily scratched and had a few minor dings. This project was much more labor intensive than the rest of my living room projects, but was so worth the effort and elbow-grease.

First I sanded all the exterior surfaces and repaired the door tracks. Then I primed and painted the entire piece. This was also my first stenciling project where I stenciled the elegant design on both doors with store bought stencils and craft paint that I got on sale at a thrift store for $2. Then I antiqued the piece with antiquing glaze. I then replaced the old dark gold knobs and drawer pulls with some that I already had, which I also painted and antiqued.

The tall candle holders on either side of the TV are actually lamp bases I found at the thrift store For $2 each.
  
Almost every single item in the picture above is a frugal find makeover project so I will include more of them in future posts.

Happy New Year! Welcome 2010!

I have decided to welcome this wonderful New Year by creating this blog in order to share with all of you more than forty years of innovative low-cost decorating tricks and techniques. I first learned the art of Centsible Chic decorating as a young mother and army wife living on a shoestring budget when money was tight but creativity was flowing and FREE!! You might say I had no choice but to learn to "improvise, adapt, and overcome" on the decorating front in true military fashion.


I perfected the art of bargain hunting. I purused garage and rummage sales, clearance racks, and thrift stores. I looked for pieces of used furniture and other decor items that others were throwing out or selling and learned to update, refinish, refurbish and repurpose them, thus developing a unique trash to treasure "Centsibly Chic" decorating style that has stayed with me throughout the years, even after the money started flowing. What can I say, it's just plain FUN!!!


As with every new year, 2010 brings with it New Year's resolutions, and the struggle to not only make them, but also to stick with them. So what better way to reinforce these goals than to share them with all of you. So here goes... 


GOAL # 1: To improve my skills on my computer and master all this new technology that has become such an integral part of daily living. (My grandson insists that I am technologically challenged!)


GOAL # 2:  To finally learn to use my new digital camera that my daughter bought me for Christmas (...two years ago) and get all of my decorating projects documented.


GOAL #3:  To complete all my patiently waiting, space-taking, unfinished decorating projects (all my "trash to treasure" finds) that I put off completing in 2007...2008...2009 (I think you get the picture here).


GOAL #4:  To share my techniques, tricks and tips with others (especially in the current economy) so that others can also create a peaceful and inviting space in which to live, grow, and prosper in the coming years, and do so while tapping into your own creative spirit and spending much less. 


I have learned that when you are surrounded by things you love and have created, it uplifts you and provides you with a true sense of home.  No matter how small your budget, you too can create a welcoming and beautiful space that you love to be in, look forward to coming home to, and hate to leave. So I invite all of you to join me in this adventure.


Look around, stay awhile, and learn much. Come back often as I plan to update the site with pictures and how to's several times each week. I also look forward to hearing from you and seeing your Centsibly Chic decorating masterpieces.